

How to make your own beautiful dried flower wreath at home…
A wreath is a loving symbol of warmth and welcome, an adornment that celebrates the beauty of the natural world, and they hold such a special place in my heart.
I made my first everlasting wreaths while I was pregnant with Ella and was looking for natural, low-maintenance ways to decorate her nursery. I fell in love with the process and the beautiful results so much that this became the very inspiration for starting AMBLE & TWINE.
Since then, my love for this craft continues to grow with each one that I make. I hope that you enjoy delving into this joyful process with me; and I hope that my Everlasting Wreath Making Kit will help you get started on the first of many wreaths that you make.

CHOOSING A STYLE
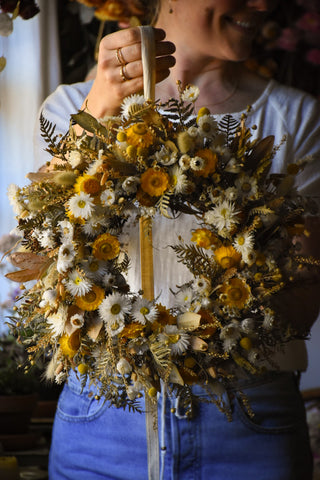
There are many styles to choose from when making a wreath. Take your time deciding what section of your base you would like to decorate and how full or minimal you would like it to look. I love a full, traditional round wreath; but I also love the way a partially decorated wreath, or crescent-shaped wreath, exposes the beautiful vine base.
When trying something new, I believe it is always a good idea to start small. When I started making wreaths, I began with a small base and a crescent shape design, covering just about a third of the base. This is a great place to start, if you are new to wreath making. A partially covered wreath requires less material, less time, and is also easier to finish off. The last bunch can simply be tied in place, exposing some stems as if it were a flattened bouquet.

One of the wonderful things about my wreath making method is that you can always cut the material off the base and start again, or reimagine your wreath later down the track. The bases that I include in my Kits are all beautiful and unique, foraged myself from local wine vineyards and our family farm. I have included enough flowers to cover a portion of the base, but you may like to include additional flowers from your own garden or some foraged greenery that is available near to you.
USING FRESH MATERIALS
It may seem odd to think of incorporating fresh greenery into your dried wreath, but if you select the right materials, this is a great way to add volume and texture to your design. Sometimes it can be much wiser to work with fresh ingredients and them let them dry in place after the design is finished. I often use this method with my bouquets as well. Particularly with plants that break easily, such as eucalyptus and wattle {mimosa}, it is much more effective to work with them while they are fresh.
With wreaths, remember that you are securing your material to a natural base with natural, breathable jute twine and then suspending the artwork up on a wall. This is the perfect environment for materials to dry off on their own, so don’t worry about them moulding, this won’t happen so long as you hang up your creation in a dry place.
Here in Australia, some of the most abundant plants that are so freely available to us are also amazing for using in wreaths. The most abundant plant of all is eucalyptus, an amazing material to use fresh and allow to dry in place. I also love to use fine-leaved native shrubs such as tea tree, or leptospermum. These work wonders in wreaths, and dry easily in place. Wattle, also known as ‘mimosa,’ is also fantastic for using fresh in wreaths. The delicate flowers can break easily, so allowing them to dry in place is ideal. Wattle is the second most abundant flowering plant in the country, so you are bound to have plenty of it to work with. You can read more about how to dry wattle, and which varieties are my favourite in my Journal post – Wattle Season | How to Dry and Create with Australian Acacias.

LETS GET STARTED
When I first started making wreaths, before I had a dedicated craft table, I used a large tray to help me stay organised. I piled up my flowers, base, and twine on the tray, as well as some bottles of fresh greenery in water. This way I could keep everything together if I needed to stop or move my project elsewhere. I am a self-taught wreath maker, and I tend to hold my wreath up, as opposed to flat on a table. I find that this allows me to add material to the inner and outer sections of the base, at a fan-like angle. But there is always more than one way to achieve a beautiful result, so find what works best for you. Make yourself a nice cup of tea, start small, work slowly, and most importantly – enjoy.

STEP 1
Have a close look at your wreath base. It is quite disheartening when your wreath is finished and you feel unhappy with the basic orientation. Once you get started, it is tricky to go back, so take your time looking at the shape of your unique base and think about which part of the vine you would like to cover, or maybe you would like to go all the way around.

STEP 2
Once you have decided which part of the vine you want to decorate, use your twine to tie a simple knot around the vine at the beginning of where you want your flowers to start. I usually have my wreath in front of me with a knot tied at the top of the base and that is where I start and work my way down the right side. I’m right-handed, so for me, I often let a small wreath base rest on my left forearm while I’m working on it; I tend to hold most of the material against the wreath with my left hand/thumb and wrap twine around with my right hand.
STEP 3
Before you get started, it is a good idea to pile up your flowers, with trimmed stems, so that they are easy to grab with one hand as you are working. Gather your flowers, mini posy by mini posy, and place them against the vine where your knot is. Once you have a nice little bunch against the wreath, {I usually hold them in place with my left thumb} start winding your twine around. Do this a few times, and when you loop around the last time, wrap the twine over your thumb, slide your thumb away, and then feed the twine through the loop you have created. Tighten. Now you can take a break and nothing will fall apart.


When adding materials, I try to give my flowers all a bit of breathing room, and also try not to tie the flower heads on too closely; give the stems a bit of length. Depending on the look you are trying to achieve, you may want to rotate when adding flowers, working from the inner part of the vine, and then fanning material out from the top of the base. I add bulkier branches towards the back and the most beautiful and delicate flowers towards the front. I try to add depth to wreaths by tying larger flowers closer to the base, and letting airy flowers float a bit higher on longer stems.

STEP 4
Continue wrapping twine, adding flowers, and repeating. I like to add lots of material. It is easy to snip some away but it is hard to add more after you are done. Stop often, step back, and remember the bigger picture of how you’d like it to look. When your twine gets short, simply tie on another length with a square knot; holding two ends of twine, go right over left and under, left over right and under with the ends and tighten. This knot will not come undone.

Follow this method until you reach as far along the vine as you would like to go. I wrap the twine around many times at the end, and then do the loop-through knot a few times as well.

Cut the twine and then take a new piece of twine and tie it around in a knot or bow. You can dress up your wreath with a natural silk ribbon and experiment with different orientations to hang it. Dried flower wreaths are so beautiful and delicate that I prefer to keep them hung indoors {as opposed to the exterior of doors} where they can be admired often at eye-level. I also find that they look wonderful near to other textural wall hangings and natural timber features.


Please feel free to get in touch with me via my contact form here, Instagram direct message, or by email at elizabeth@ambleandtwine.com if you have any questions. In the 'Tools' collection of my shop I offer two Everlasting Wreath Making Kits, one includes simple white paper daisies and one includes a vibrant mix of wildflowers.
I would love to see what you create on your wreath making journey! Tag me on Instagram @ambleandtwine so that I can share your unique creation with our lovely, like-minded community.
I hope you enjoy.
Elizabeth xx
